
Who can do what
Open Inventory
Inventory is in the Lab operations group of the left-hand navigation. The page opens on the Chemicals tab, with Biologicals and Consumables beside it, a search box bound to the active tab, and a + button for adding a material. The Chemicals and Biologicals tabs show two tiles, Expiring soon and Expired, and a row of type chips (All plus each type in use) that filter the table. An organization with nothing on a tab sees No chemicals added with an Add chemical button, No biological inventory or No consumable inventory.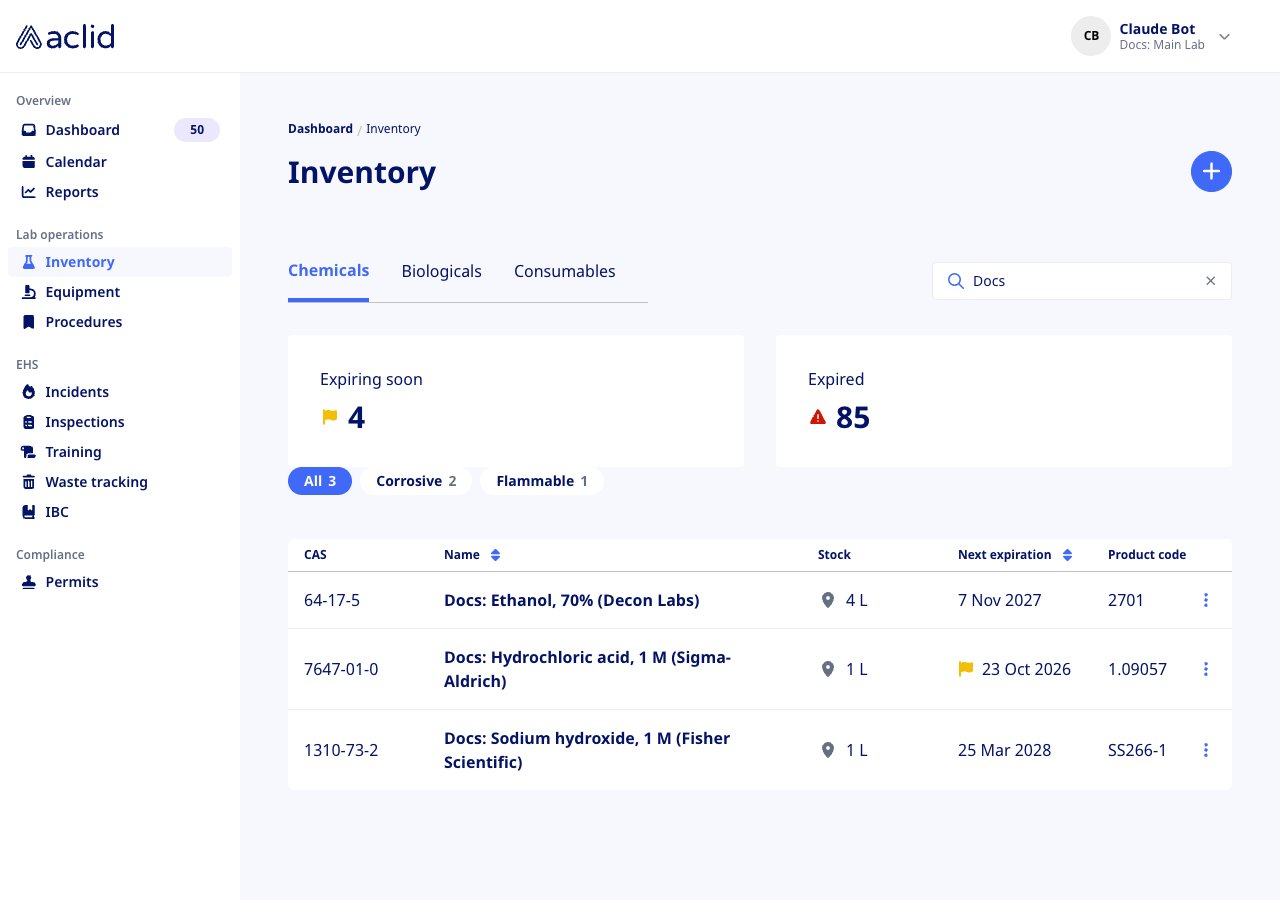
The Chemicals tab, with the expiry tiles and the type filter chips
Key concepts
- Chemical: a product in the chemical catalog, shown as name (manufacturer) with its CAS number and product code. Chemicals can be filed under one or more types (for example Corrosive), which appear as badges on the detail page and as filter chips above the list.
- Biological: a cell line, strain, tissue or other biological material with a Status (Active, Archived or Quarantined), a Biosafety level (BSL-1 to BSL-4) and a Type picked from the list or added as you type.
- Consumable: a supply such as gloves, tips or a kit, with an optional Type, Manufacturer and Product code.
- Containers: a stock entry is a number of identical containers of one material at one location. Each entry has a Container type (bottle, tube, vial, box, kit, cryovial, tissue cassette, microcentrifuge tube or screw cap tube), a Container volume with a Unit of measure (grams, kilograms, gallons, liters, milliliters, ounces, micrograms, nanomoles or pounds), a Location, an optional Sublocation, an Expiration date, a Received date and a Batch/Lot ID. A material stays in your inventory even when it has no containers left.
- Sublocation: a named spot within a location, such as a shelf, cabinet or freezer.
- Quantities: the Stock column adds up the containers of a chemical (two 500 mL bottles show as 1 L); it shows Various when the volumes cannot be combined. Biologicals and consumables show a Containers count instead.
- SDS: the chemical’s safety data sheet. A chemical added from the product-code search is linked to its sheet, so its CAS number, product code, hazards and handling text come from the sheet. A hand-entered chemical gets its SDS from a PDF you upload. Hazard statements from the sheet appear under Hazard Classification Guidance from OSHA, each with its GHS pictogram, Hazard class, Category, Hazard statement and Code; the signal word shows as a red Danger or yellow Warning badge, and Chemical properties lists the Physical state, Flash point, Boiling point and Vapor pressure when the sheet gives them.
- Notes: your organization’s own text on one section of a material’s Safe handling card: Storage requirements, Personal protection, Disposal notes or Miscellaneous. A note shows as Note from the person who wrote it, and adding another note to the same section replaces it. Consumables keep their notes in a Notes card.
- Expiring soon and Expired: the number of chemicals (or, on the Biologicals tab, biologicals) that have in-stock containers expiring within the next 30 days, or already expired.
Tasks
Find a chemical
- Type in Search chemicals…; the table narrows as you type. The empty state reminds you to Search by chemical name, CAS number, manufacturer, or product code; Clear search restores the full list.
- Click a type chip to show only chemicals of that type, and click Name or Next expiration to sort.
- Click a row to open the chemical, or use its ⋮ menu: Details opens the page and SDS opens the sheet in a new tab when the chemical has one.
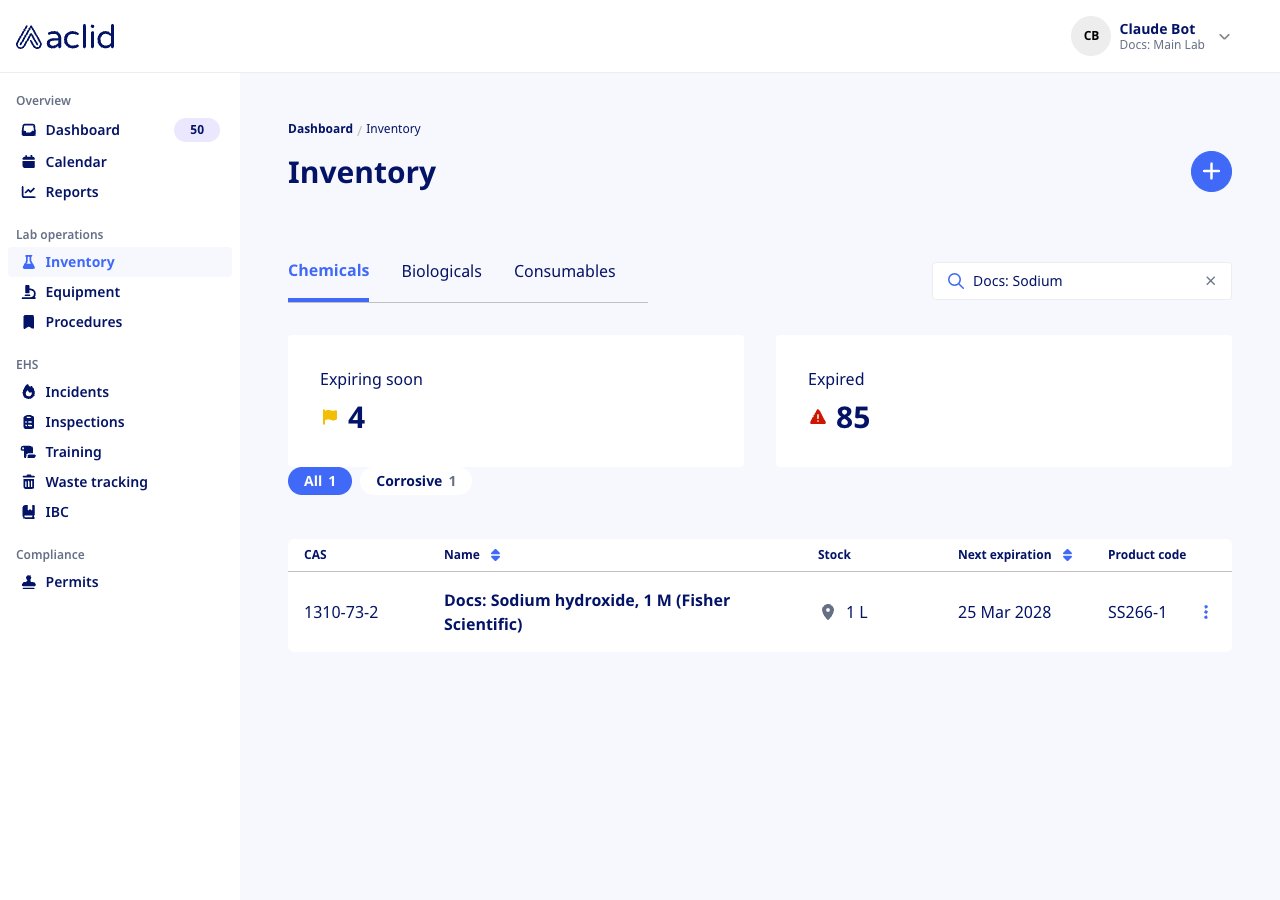
Searching the Chemicals tab
Add a chemical from its product code
- On the Chemicals tab click +. Add a chemical opens on Chemical product code; the hint says Try the Product Number or Catalog Number from the label.
- Enter the code and click Search. Under Find your chemical, pick the matching product code | name (manufacturer) and click Add to inventory. If nothing matches, shorten the code (the hint suggests dropping the suffix after the dash) or click Enter manually.
- The chemical’s page opens with a banner, added to inventory. Add containers below., and its SDS, CAS number and hazards already filled in.
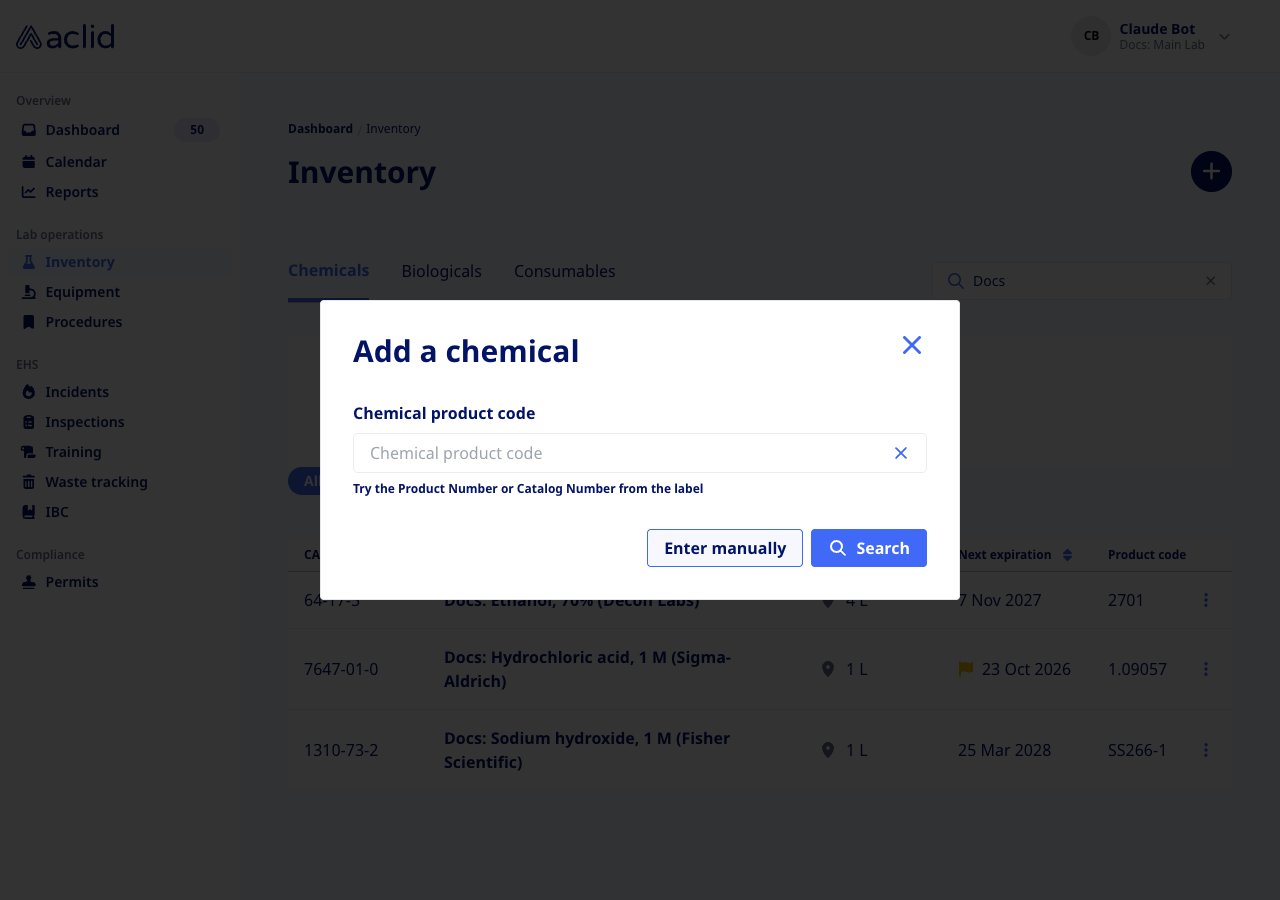
Add a chemical: searching by product code
Add a chemical by hand
- In Add a chemical, click Enter manually.
- Fill in Chemical name and Manufacturer (both required), and optionally Type (optional), Product code (optional), CAS number (optional) and Upload SDS file (optional) (a PDF).
- Click Add to inventory. The new chemical’s page opens; use Update to change its name, manufacturer or types later, and Edit on the CAS number, Product code or Safe handling cards to fill in the sheet details yourself.
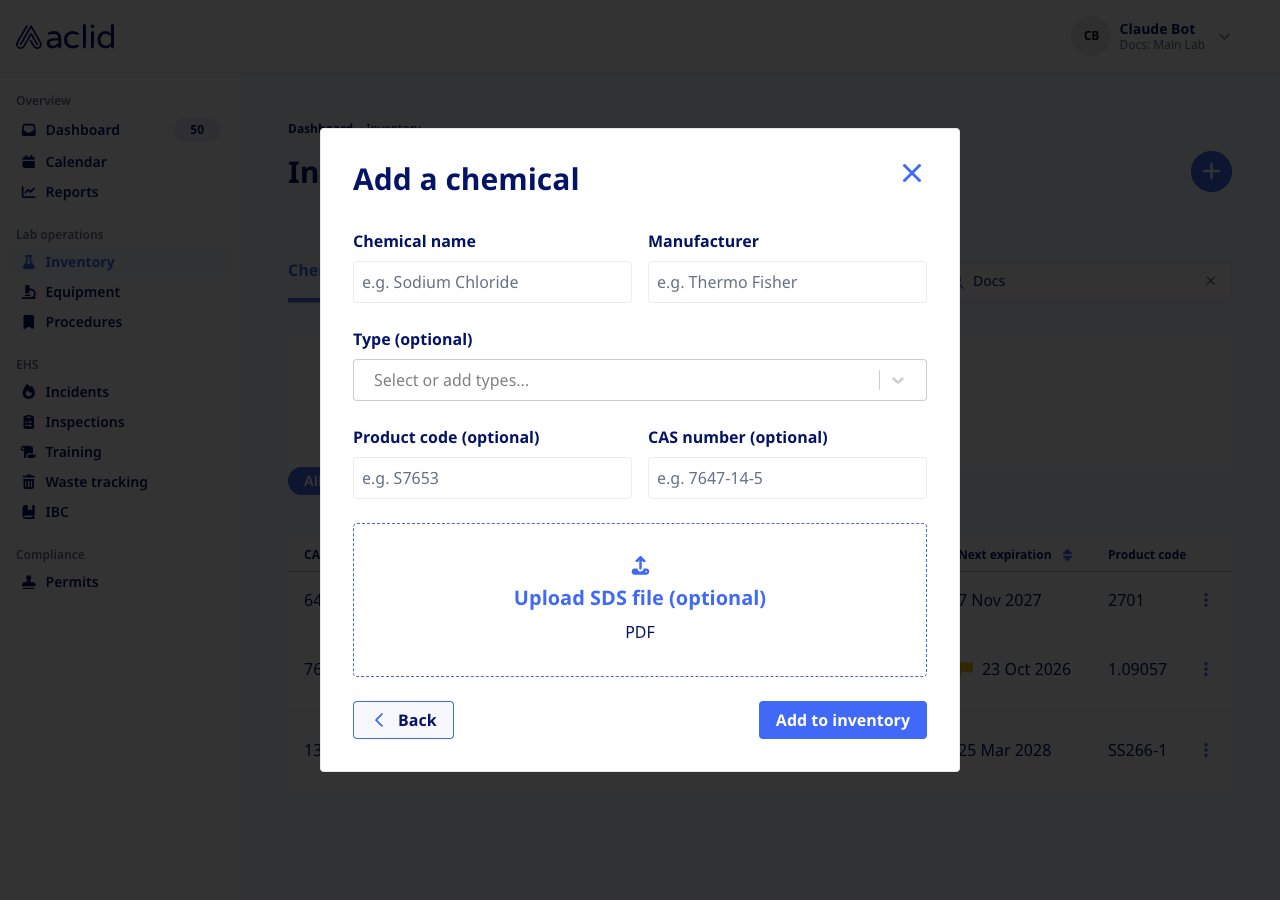
Add a chemical: the manual form
Scan a container label on your phone
- On a phone, the Chemicals tab shows a pencil button instead of +. Tap it: the add dialog opens on a Scan tab (with Search beside it) and starts the camera.
- Hover over the chemical name, product code, or CAS number and take the photo. When the label is read, Product detected shows the code and name, with Add and, if you already hold that chemical, Remove.
- Add opens the containers form for the chemical, creating it from its SDS first if it is new to your inventory; an expiry date read from the label is filled in for you. Remove asks for the Container location, Container type, Expiration date and Number of containers to remove.
- If the label cannot be read, Unable to find product offers Scan again or Search manually.
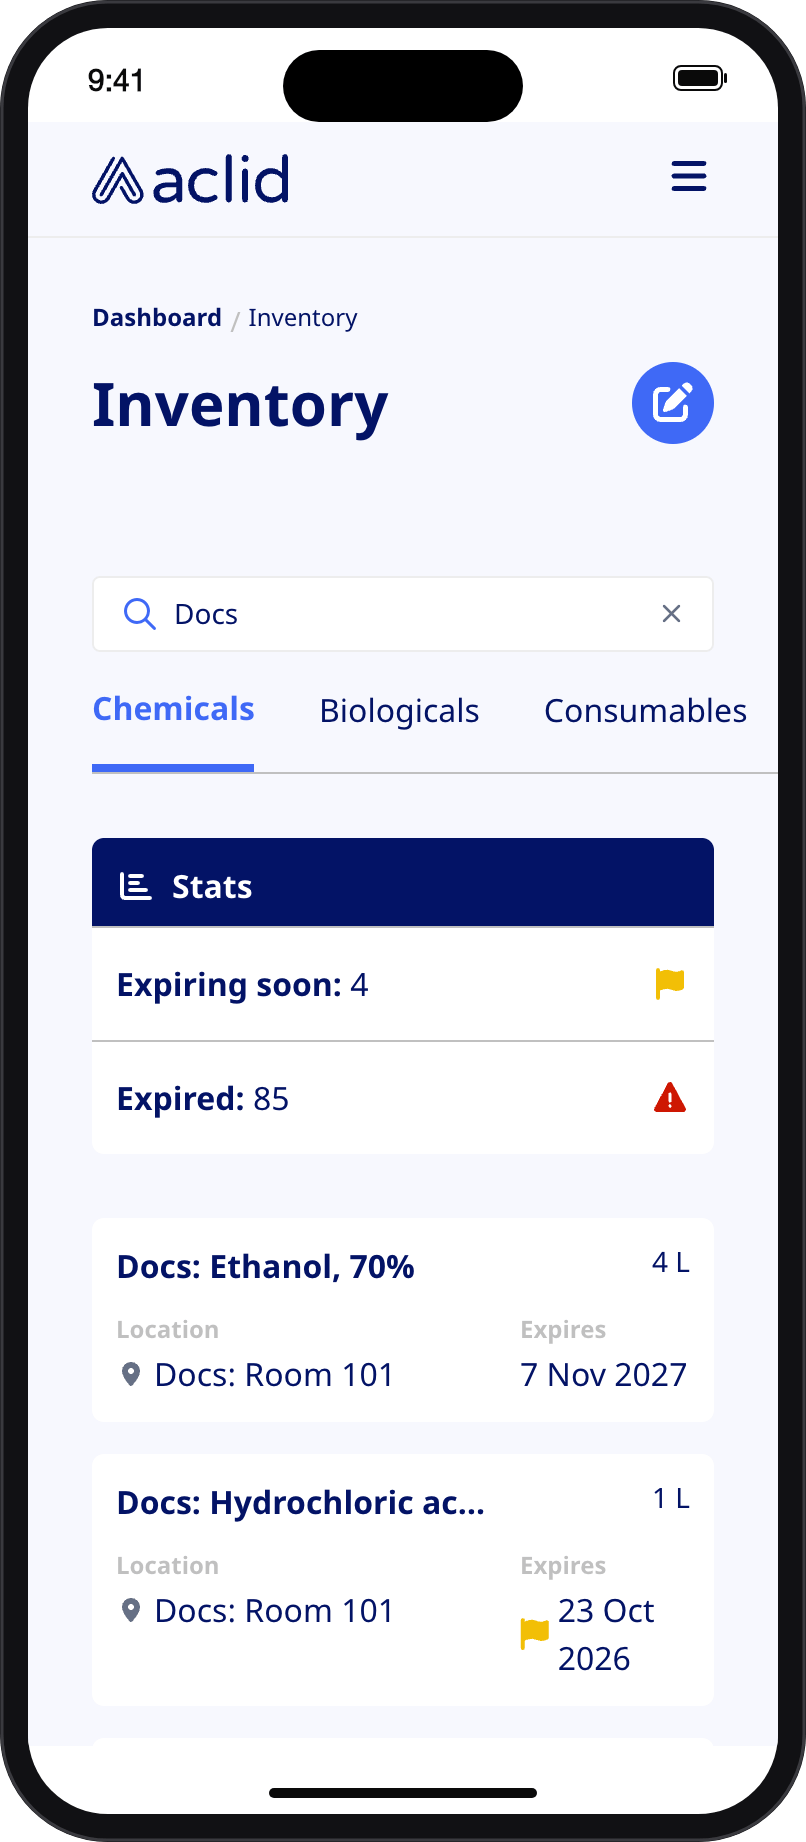
Inventory on a phone: the pencil button opens the scanner
Add, edit or remove containers
- Open the material and click Add containers on the containers card (its heading counts what you hold, for example 2 containers (1 L), or reads No containers added).
- Pick a Container type and enter the Number of containers (required). Add the Container volume and Unit of measure (not for kits), the Location (optional) and Sublocation (optional), the Expiration date (optional) and Received date (optional), and a Batch/Lot ID (optional).
- Click Add containers. A banner such as 2 bottles (500 mL each) added to inventory confirms it, and the entry appears under its location with its Batch/Lot ID, Rec: and Exp: dates.
- To change an entry, click its pencil icon: Edit container opens the same form, saved with Save changes. To take containers out, click the bin icon: Remove from inventory asks for the Number of containers to remove (or confirms directly when there is only one) and reports removed from inventory. An entry disappears from the page when its count reaches zero.
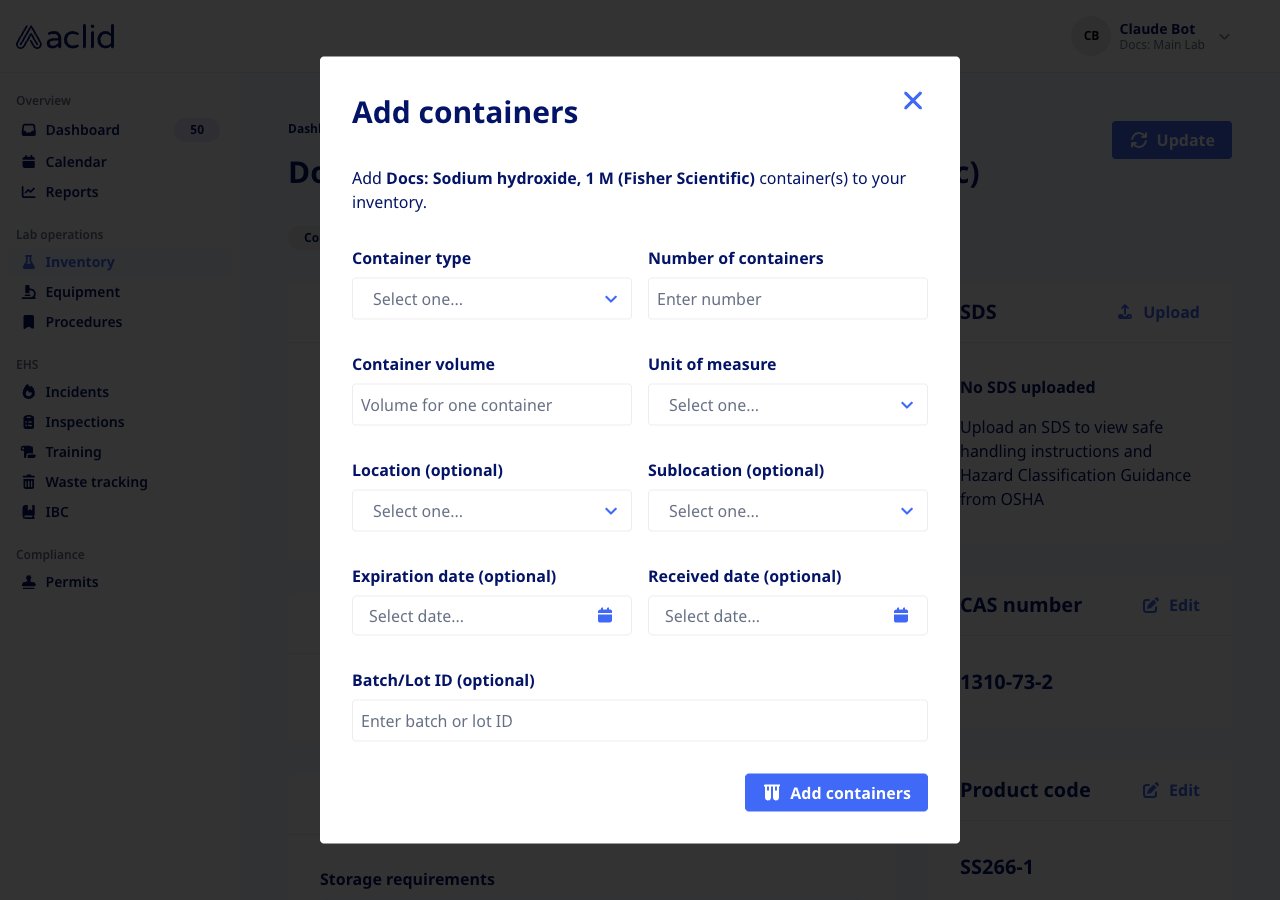
The Add containers form
Review a chemical
- Open the chemical. Its badges show the signal word, GHS tags, types and, when recorded, Owner.
- The left column holds the containers card, Additional details and Safe handling; the right column holds SDS (with Upload, or Replace and View once a sheet is attached; otherwise No SDS uploaded), CAS number, Chemical properties and Product code.
- Admins click Add on Additional details to keep custom Field name / Value pairs for your organization (Add field, then Save changes), and Delete to clear them after confirming Yes, delete.
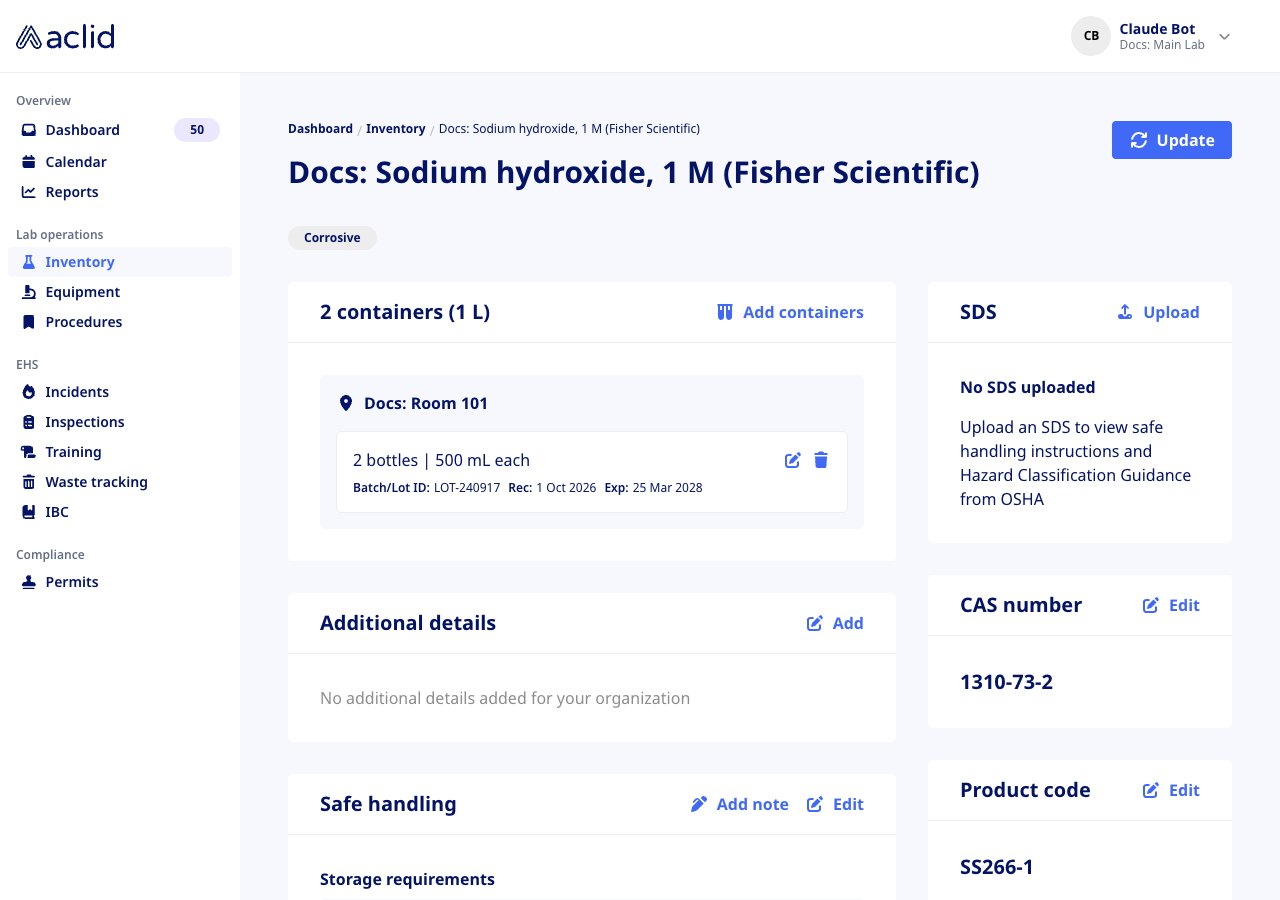
A chemical with two bottles at one location and no SDS yet
Add a safe-handling note
- On the chemical’s Safe handling card click Add note. The dialog says Your name will automatically be added to the note.
- Answer Which section is this note related to? (Storage requirements, Personal protection, Disposal notes or Miscellaneous), write the Note and click Add note.
- A banner such as Storage requirements note added confirms it, and the note appears in that section beside any text from the SDS. On a consumable, Add note on the Notes card files the note under Miscellaneous.
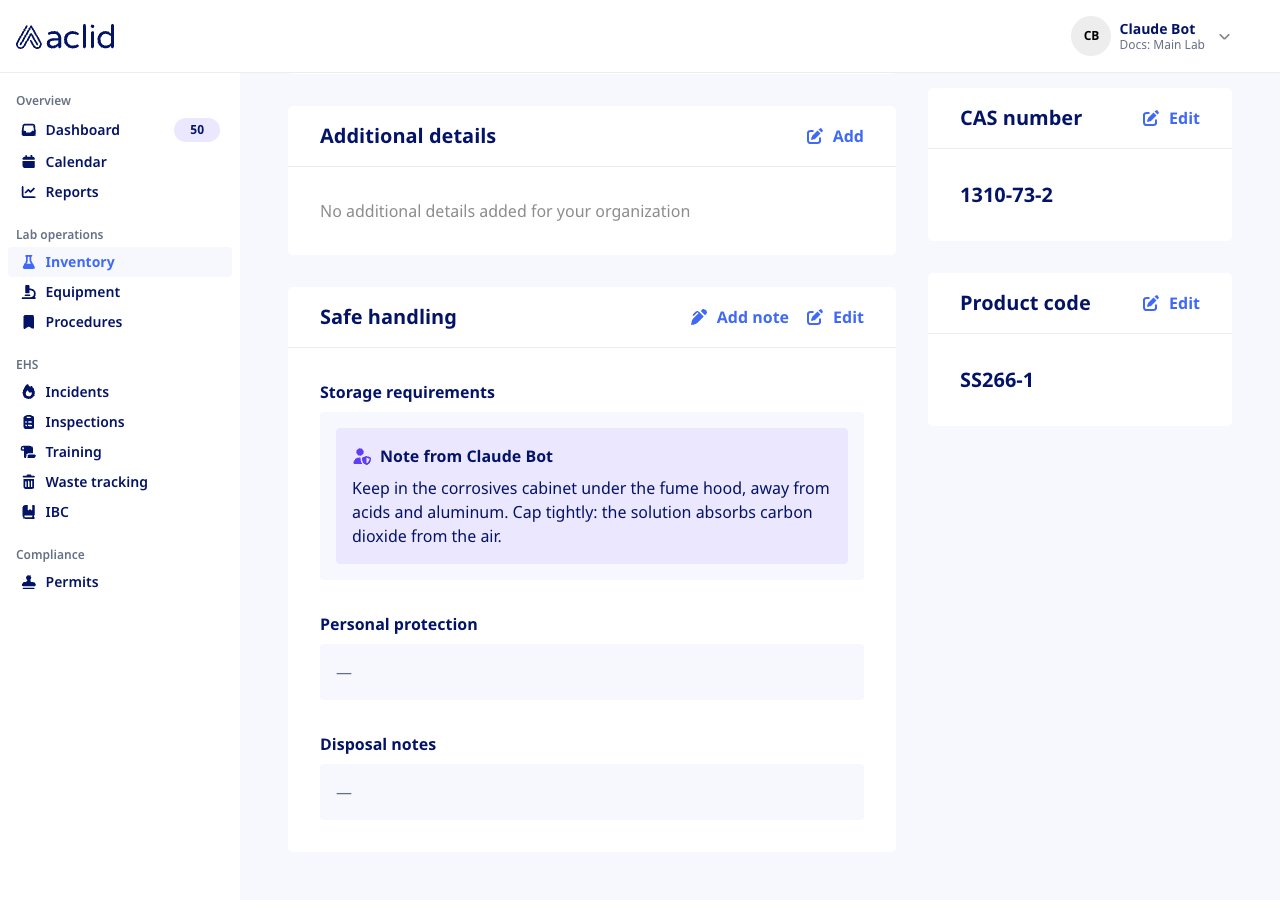
A storage note on the Safe handling card
Add a biological or a consumable
- Switch to the Biologicals or Consumables tab and click +.
- Add a biological asks for a Name, an optional Type (pick one or add your own), a Status and a Biosafety level; click Add biological to open its page, where Edit fills in its Overview, Source, Risk & compliance, Safe handling and Additional details sections, and Update status moves it between Active, Archived and Quarantined.
- Add a consumable asks for a Name plus Type (optional), Manufacturer (optional) and Product code or model number (optional); click Add consumable and the new row appears in the table. Open it and click Edit on the Overview card to change those fields later.
- Open either one and click Add containers to record what you hold.
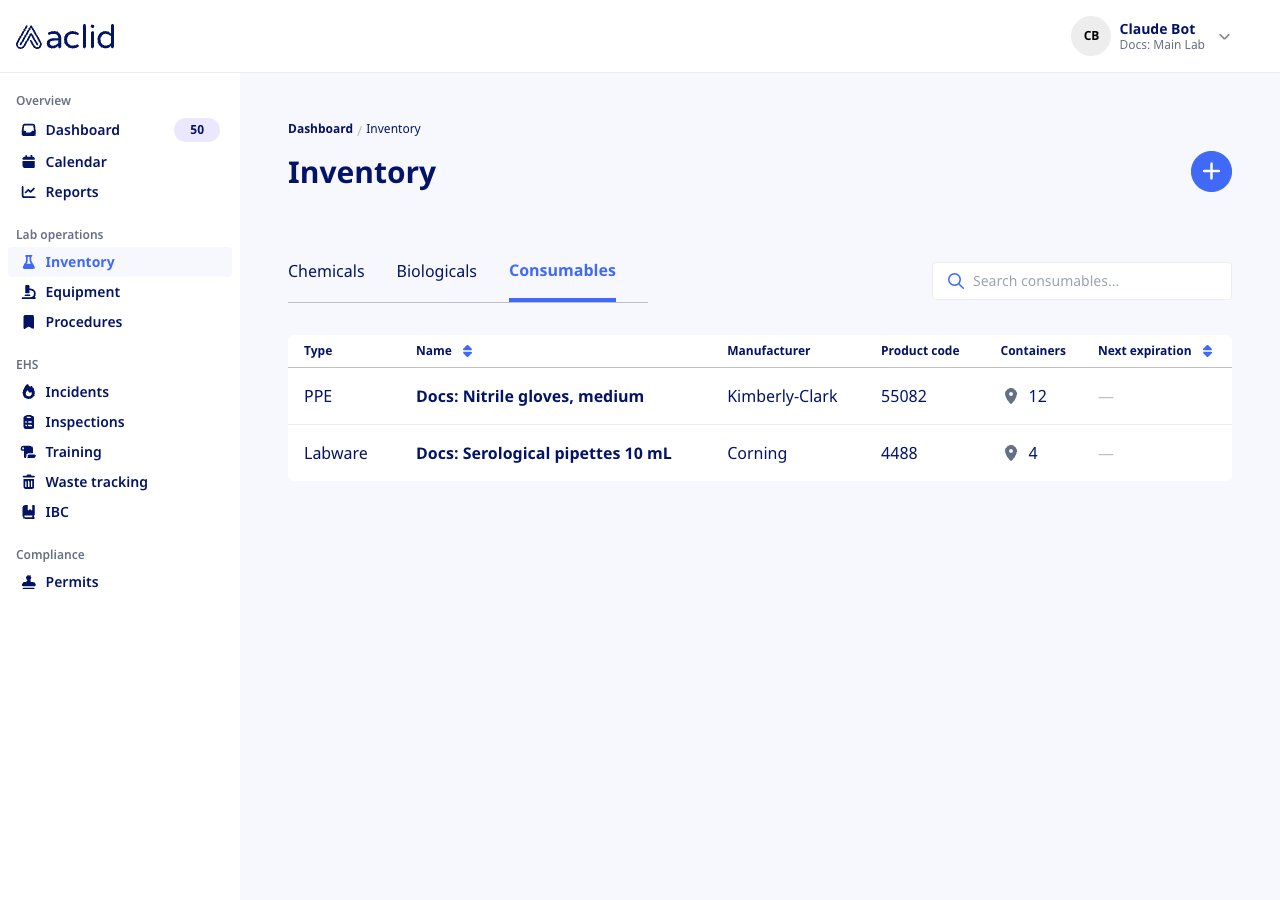
The Consumables tab
Reading the list
- Chemicals: CAS (Various when the sheet lists several components), Name, Stock (the combined volume, with a pin icon whose tooltip names the location), Next expiration and Product code.
- Biologicals: Type, Name, a Status badge (green Active, yellow Archived or Quarantined), Biosafety level, Containers and Next expiration.
- Consumables: Type, Name, Manufacturer, Product code, Containers and Next expiration.
- Next expiration is the earliest expiry among the material’s containers. A red triangle marks it Expired; an orange flag marks it Expiring soon (within 30 days). The same icons sit on the Expired and Expiring soon tiles, and an expired Exp: date is shown in red on the detail page.
- On a phone the tables become cards with Location and Expires, and the tiles become a Stats card.
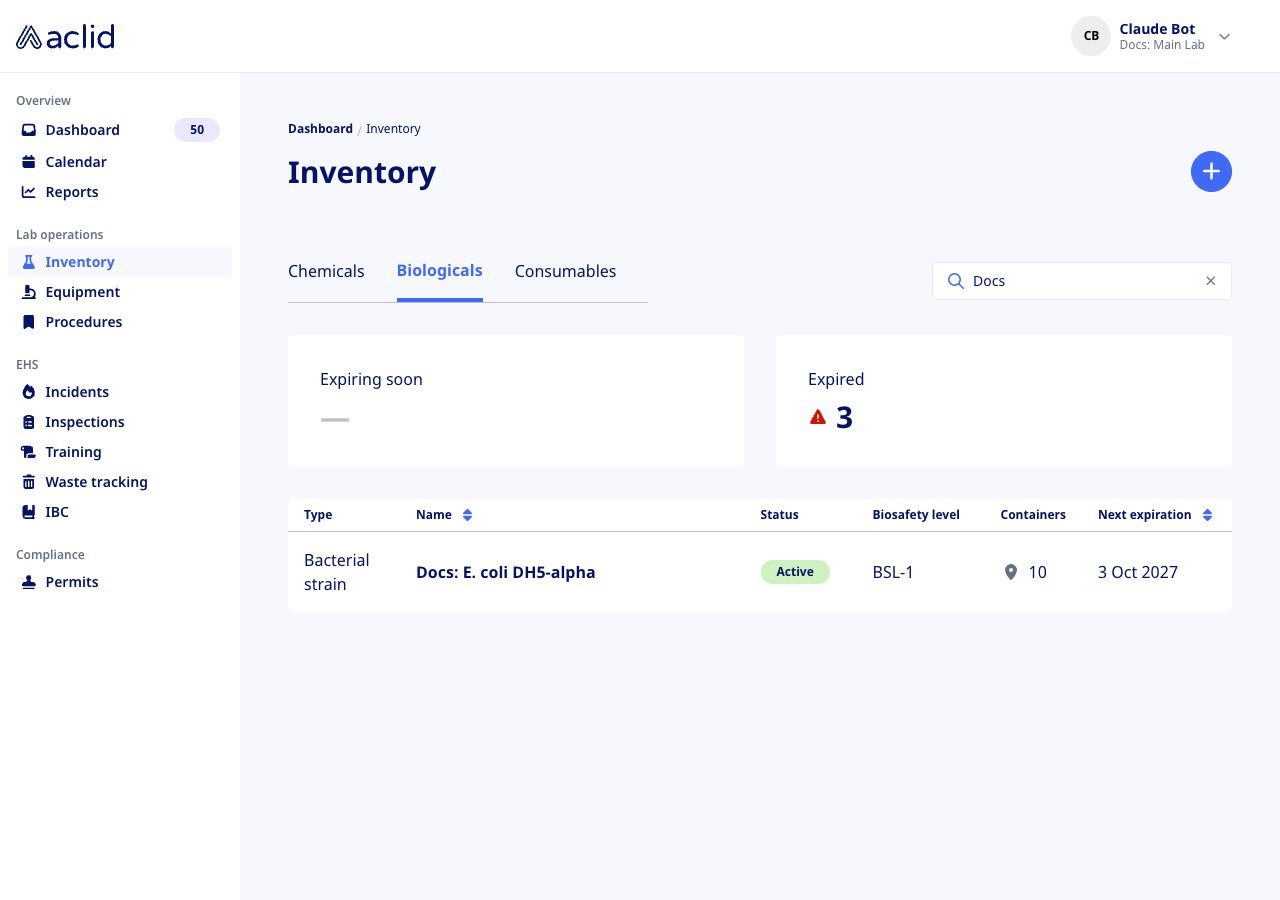
The Biologicals tab
Tips and limits
- The Location (optional) list in the containers form offers the locations set up for inventory; containers added without one are grouped under Unspecified.
- Chemicals linked to a sheet from the product-code search do not show Update, Upload or the Edit buttons: their details come from the sheet. Enter a chemical manually when you need to maintain those fields yourself.
- An SDS must be a PDF. The SDS card previews the first page; View opens the whole document.
- Additional details are admin-only and specific to your organization; other users see them but cannot change them.
- Scanning needs camera access; if the browser has refused it, the Scan tab shows Camera access required with the steps to allow it. Scanning is only offered on narrow screens.
- There is no delete for a material in the app: remove its containers instead, and it stays available with an empty containers card.
- Searching the Biologicals and Consumables tabs matches on name or type; the Chemicals search also matches CAS numbers, manufacturers, product codes and the names of locations that hold the chemical.
Related
- Incidents: name chemicals and biologicals involved in a report
- Waste tracking: manifests for what leaves the lab
- Settings: sites and who can see them
- Chemical, Stock and InventoryMetrics in the API reference
- chemicals, addStock and processChemicalLabel