> ## Documentation Index
> Fetch the complete documentation index at: https://wiki.aclid.bio/llms.txt
> Use this file to discover all available pages before exploring further.
# User profiles
> Keep each person's employee details, groups, site access, personal documents and completed training on one page.
A user profile is one person's page in the app. It holds their employee details (role, department, hire date, supervisor, specialties, contact details), the groups they belong to, the sites they can work in, the personal documents on file for them, and the trainings they have completed. Admins use it to set a colleague up; everyone can keep their own details current. Groups feed training assignments, and site access decides which site-specific records a person can reach.
## Who can do what
| Action | Admin | Member |
| - | - | - |
| Open a profile from **Settings** | Yes | No |
| View a profile | Yes | Yes |
| Edit the employee profile and change the photo | Any profile | Their own profile |
| Add a user to a group or remove them | Yes | No |
| Edit site access | Yes | No (the **Site access** card is not shown) |
| Upload or delete personal documents | Any profile | Their own profile |
| View completed training | Yes | Yes |
## Open User profiles
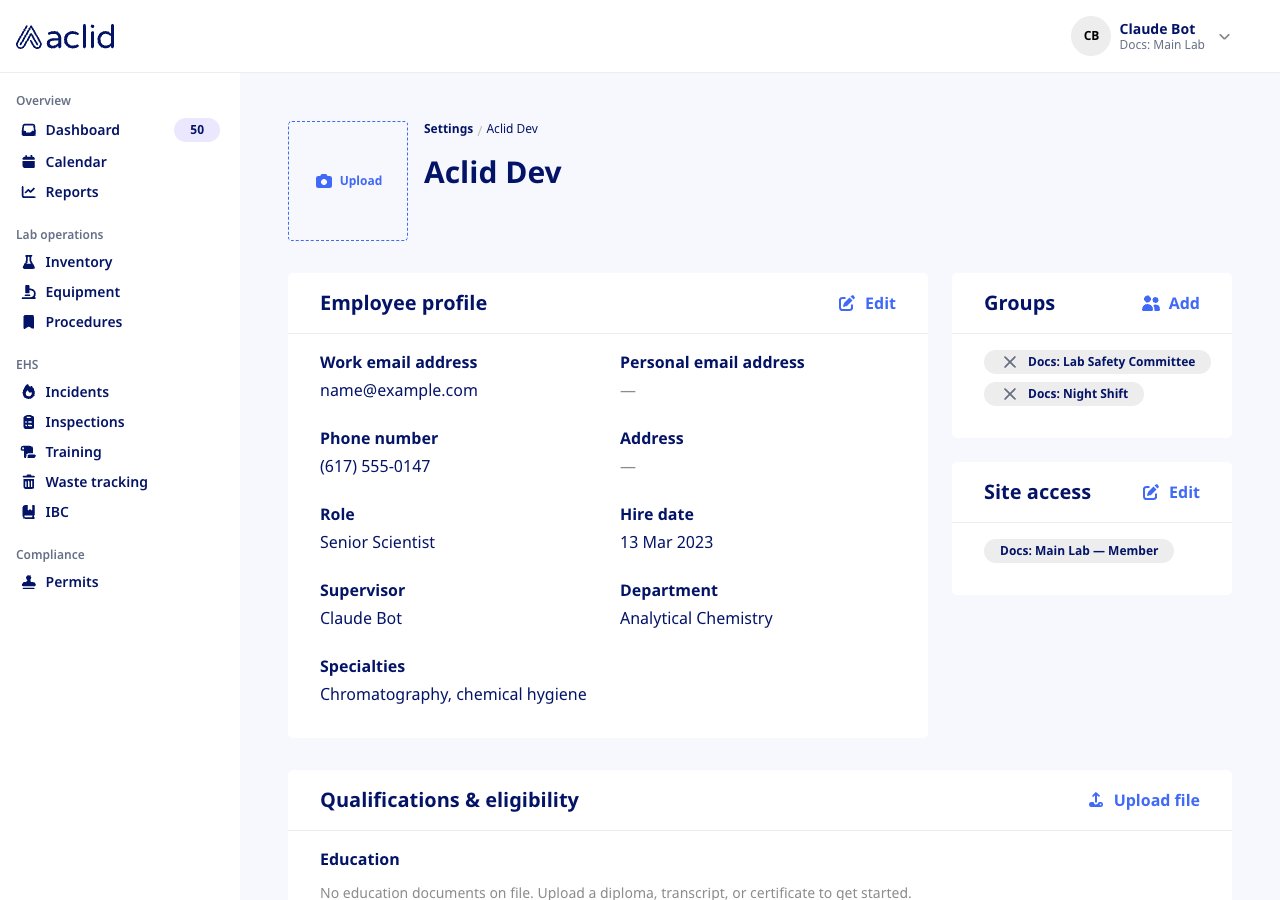
Open the menu under your name in the top-right corner and choose **Settings**. On the **Users** tab, click a row to open that person's profile. The breadcrumb reads **Settings** / the person's name, with their name as the page title. If you can edit the profile, a dashed **Upload** box for the profile photo sits to the left of the name.
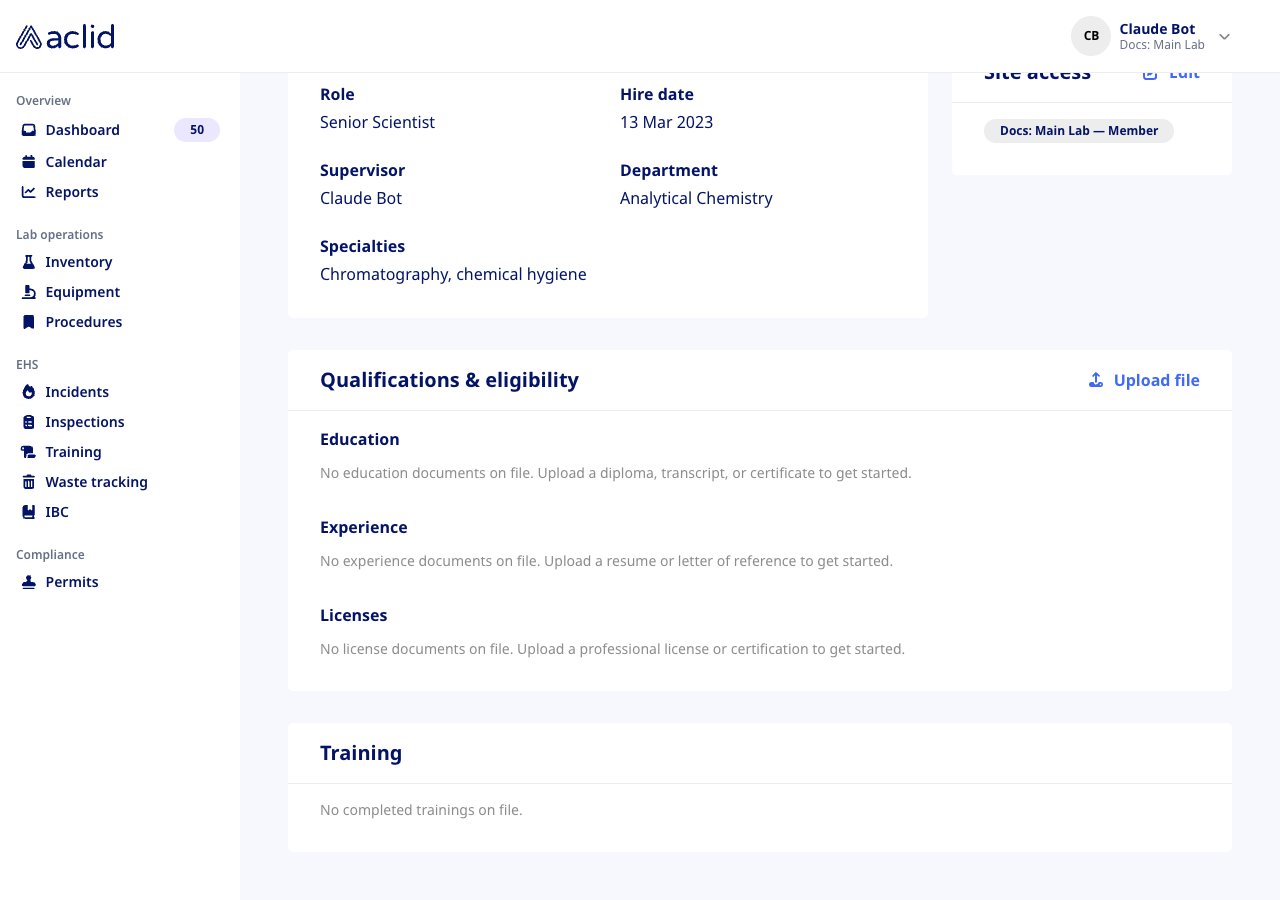
The page is laid out as cards: **Employee profile** with **Groups** and **Site access** beside it, then **Qualifications & eligibility** and **Training** below.
 ## Key concepts
* **Employee profile**: the person's **Work email address**, **Personal email address**, **Phone number**, **Address**, **Role** (their job title), **Hire date**, **Supervisor**, **Department** and **Specialties**. An empty field shows a dash. The work email is the sign-in address and cannot be changed here.
* **Groups**: named sets of users, used to assign a training to many people at once. A person can be in any number of groups.
* **Organization role**: every user is an **Admin** or a **Member** of the organization. It is set when the user is invited and is not changed on the profile.
* **Site access**: a user with no site assignment sees the badge **All — Admin** or **All — Member** and can work in every site with their organization role. Assigning them to sites shows one badge per site, such as *Main Lab — Member*, with the role they hold there (**Admin** or **Member**). A user assigned to sites is restricted: they only reach records that belong to their assigned sites, with the role they hold at each site.
* **Qualifications & eligibility**: personal documents filed under **Education**, **Experience** and **Licenses**, each with a **Filename** and **Uploaded** date.
* **Training**: the person's completed trainings, grouped by training, with the **Completed** date, **Quiz score**, **Type** and a **Certificate** download when one is available.
## Tasks
### Edit employee details
You can edit your own profile; admins can edit anyone's.
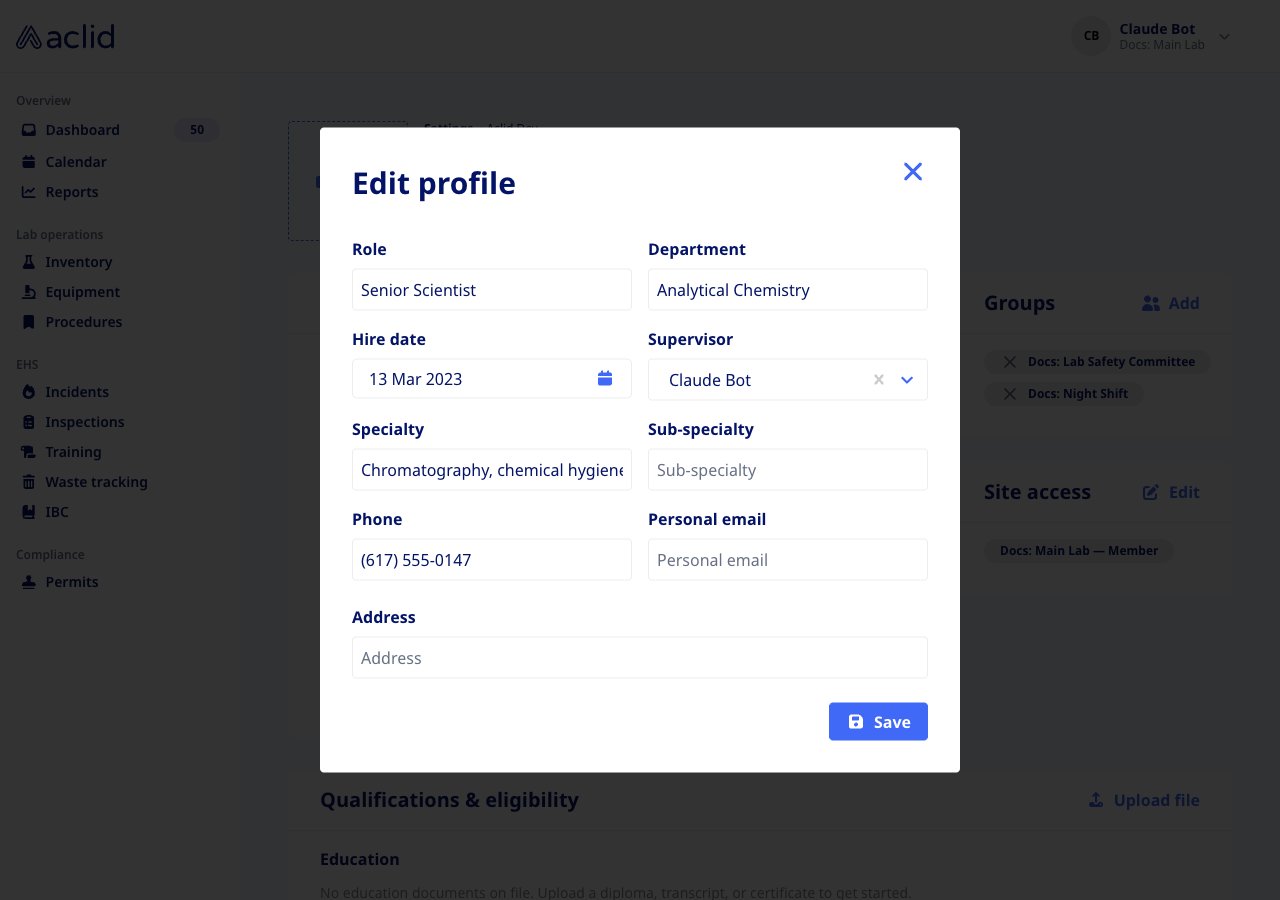
1. Click **Edit** on the **Employee profile** card. The **Edit profile** dialog opens with the current values filled in.
2. Change any of **Role**, **Department**, **Hire date**, **Supervisor**, **Specialty**, **Sub-specialty**, **Phone**, **Personal email** and **Address**. **Supervisor** offers every other user in the organization and can be cleared with the small cross. Every field is optional; clearing one removes the value.
3. Click **Save**. The dialog closes and the card shows the new values.
To change the photo, click the **Upload** box (or the current photo) next to the name. The **Add photo** dialog opens with the prompt *Upload a profile photo*; drop or select a PNG, JPEG, GIF or WebP image of at most 25 MB and click **Add photo**.
## Key concepts
* **Employee profile**: the person's **Work email address**, **Personal email address**, **Phone number**, **Address**, **Role** (their job title), **Hire date**, **Supervisor**, **Department** and **Specialties**. An empty field shows a dash. The work email is the sign-in address and cannot be changed here.
* **Groups**: named sets of users, used to assign a training to many people at once. A person can be in any number of groups.
* **Organization role**: every user is an **Admin** or a **Member** of the organization. It is set when the user is invited and is not changed on the profile.
* **Site access**: a user with no site assignment sees the badge **All — Admin** or **All — Member** and can work in every site with their organization role. Assigning them to sites shows one badge per site, such as *Main Lab — Member*, with the role they hold there (**Admin** or **Member**). A user assigned to sites is restricted: they only reach records that belong to their assigned sites, with the role they hold at each site.
* **Qualifications & eligibility**: personal documents filed under **Education**, **Experience** and **Licenses**, each with a **Filename** and **Uploaded** date.
* **Training**: the person's completed trainings, grouped by training, with the **Completed** date, **Quiz score**, **Type** and a **Certificate** download when one is available.
## Tasks
### Edit employee details
You can edit your own profile; admins can edit anyone's.
1. Click **Edit** on the **Employee profile** card. The **Edit profile** dialog opens with the current values filled in.
2. Change any of **Role**, **Department**, **Hire date**, **Supervisor**, **Specialty**, **Sub-specialty**, **Phone**, **Personal email** and **Address**. **Supervisor** offers every other user in the organization and can be cleared with the small cross. Every field is optional; clearing one removes the value.
3. Click **Save**. The dialog closes and the card shows the new values.
To change the photo, click the **Upload** box (or the current photo) next to the name. The **Add photo** dialog opens with the prompt *Upload a profile photo*; drop or select a PNG, JPEG, GIF or WebP image of at most 25 MB and click **Add photo**.
 ### Add a user to groups
Admins only.
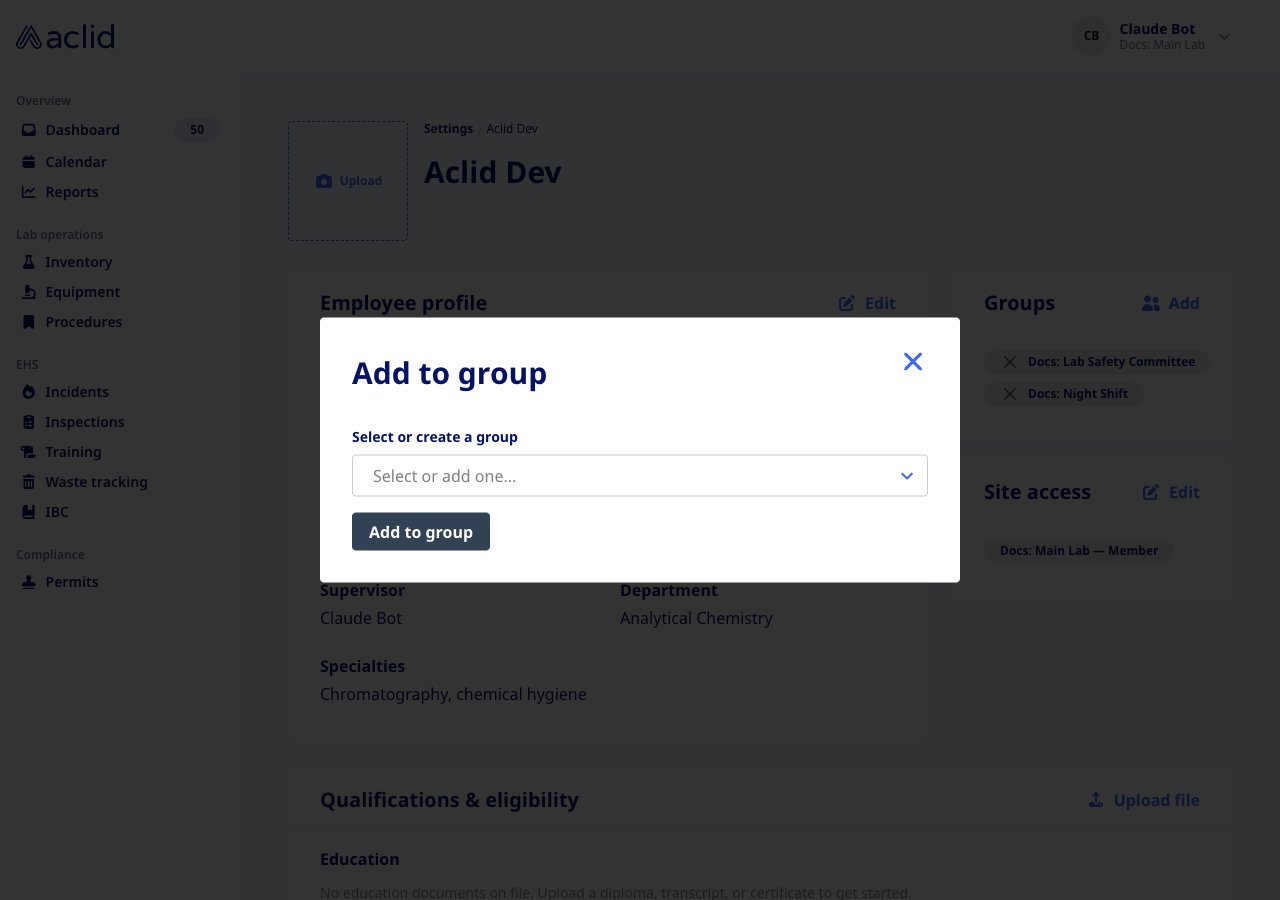
1. Click **Add** on the **Groups** card (the card reads **Not added** when the person is in no group yet). The **Add to group** dialog opens.
2. Under **Select or create a group**, pick an existing group from **Select or add one...**, or type a new name and choose **Add "…"** to create the group on the spot. Each choice appears as a badge in the dialog; click its cross to drop it before saving.
3. Click **Add to group** (or **Add to groups**). The badges appear on the **Groups** card.
To remove the person from a group, click the cross on that group's badge on the card. The change applies immediately.
### Add a user to groups
Admins only.
1. Click **Add** on the **Groups** card (the card reads **Not added** when the person is in no group yet). The **Add to group** dialog opens.
2. Under **Select or create a group**, pick an existing group from **Select or add one...**, or type a new name and choose **Add "…"** to create the group on the spot. Each choice appears as a badge in the dialog; click its cross to drop it before saving.
3. Click **Add to group** (or **Add to groups**). The badges appear on the **Groups** card.
To remove the person from a group, click the cross on that group's badge on the card. The change applies immediately.
 ### Set site access
Admins only.
The **Site access** card only appears once your organization has at least one site.
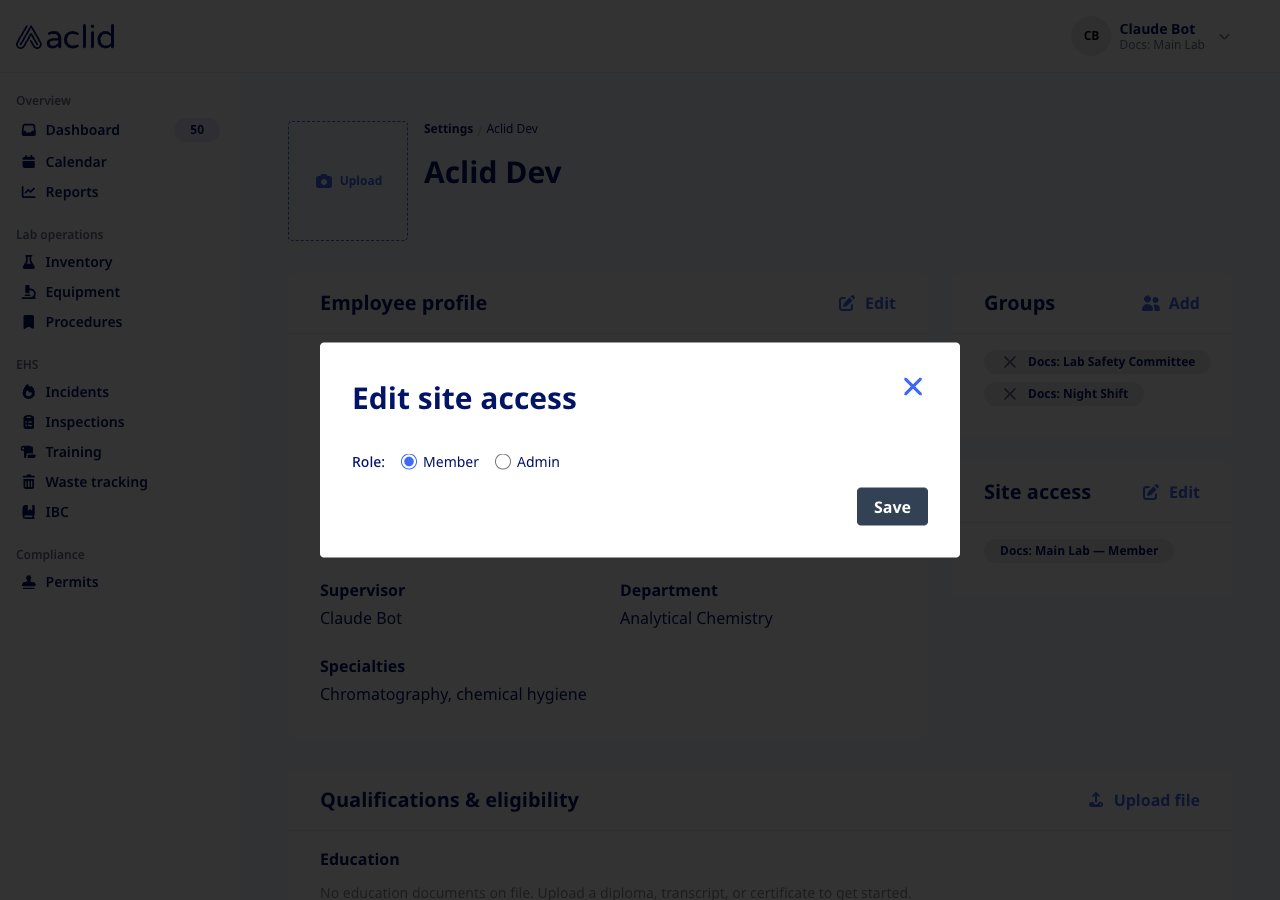
1. Click **Edit** on the **Site access** card. The **Edit site access** dialog opens.
2. In an organization with a single site, choose the person's **Role** at that site: **Member** or **Admin**.
3. In an organization with several sites, pick each site from **Select a site...**; it is added with the **Role** currently selected below the list, so set the role before adding a site. A site already added keeps its role, which lets a person be an admin at one site and a member at another. Click a badge's cross to remove that site, or pick **All** to lift the restriction.
4. Click **Save**. The button stays disabled until something has changed.
### Set site access
Admins only.
The **Site access** card only appears once your organization has at least one site.
1. Click **Edit** on the **Site access** card. The **Edit site access** dialog opens.
2. In an organization with a single site, choose the person's **Role** at that site: **Member** or **Admin**.
3. In an organization with several sites, pick each site from **Select a site...**; it is added with the **Role** currently selected below the list, so set the role before adding a site. A site already added keeps its role, which lets a person be an admin at one site and a member at another. Click a badge's cross to remove that site, or pick **All** to lift the restriction.
4. Click **Save**. The button stays disabled until something has changed.
 ### Upload a personal document
You can add documents to your own profile; admins can add them to anyone's.
1. Click **Upload file** on the **Qualifications & eligibility** card. The **Upload document** dialog opens.
2. Choose the **Document type**: **Education**, **Experience** or **Licenses**.
3. Drop or select the file. PDF, DOC, DOCX and PAGES files up to 25 MB are accepted; the **Display name** is filled from the file name and can be changed.
4. Click **Upload**. The document is listed under its type with its **Filename** and **Uploaded** date.
Use the three-dot menu on a row to **View** the document in a new tab or, if you can edit the profile, **Delete** it. Deleting is immediate and cannot be undone.
### Upload a personal document
You can add documents to your own profile; admins can add them to anyone's.
1. Click **Upload file** on the **Qualifications & eligibility** card. The **Upload document** dialog opens.
2. Choose the **Document type**: **Education**, **Experience** or **Licenses**.
3. Drop or select the file. PDF, DOC, DOCX and PAGES files up to 25 MB are accepted; the **Display name** is filled from the file name and can be changed.
4. Click **Upload**. The document is listed under its type with its **Filename** and **Uploaded** date.
Use the three-dot menu on a row to **View** the document in a new tab or, if you can edit the profile, **Delete** it. Deleting is immediate and cannot be undone.
 ## Reading the list
* **Edit** and **Upload file** buttons appear only when you can edit the profile (your own, or any profile as an admin). The **Add** button and the crosses on the **Groups** card appear in the same cases, but only an admin's change is accepted.
* **All — Admin** or **All — Member** under **Site access** means no site assignment: the person works in every site with their organization role. *Site — Admin* or *Site — Member* badges list the sites they are limited to and their role at each.
* **Qualifications & eligibility** shows a sentence such as *No education documents on file* for each type with nothing uploaded.
* **Training** shows *No completed trainings on file* until the person completes a training. Each completed row shows **Completed**, **Quiz score** (a dash for trainings without a quiz), **Type** and a **Certificate** download; a *Refresher* marker flags repeat completions of the same training.
## Tips and limits
* Members do not see **Settings**, so there is no link to their own profile in the navigation; an admin can send them the page. Only admins and the person themselves can change a profile.
* The work email, name and organization role are not edited on the profile. Admins set the role when inviting the user.
* Site access can be edited only by admins, and the card is hidden until a site exists. Choosing **All** in a multi-site organization removes every assignment; in a single-site organization the dialog only switches the role.
* Removing every site badge in the **Edit site access** dialog leaves nothing to save and **Save** stays disabled. To lift a restriction, pick **All** instead.
* Site access narrows what a restricted user sees in two ways. Site-scoped records such as equipment are only reachable at the user's sites, and equipment that belongs to no site is out of reach for them. Protocols, policies and trainings restricted to particular sites are hidden unless one of those sites is the user's; those with no site restriction stay visible to everyone.
* Supervisors can only be chosen from other users in the organization; a user cannot supervise themselves.
* Documents are limited to PDF, DOC, DOCX and PAGES files of at most 25 MB; profile photos to PNG, JPEG, GIF and WebP of at most 25 MB.
* Completed trainings are read-only here. Assign, mark attendance and complete trainings from the Training module.
## Related
* [Settings](/guides/settings) covers inviting users, the **Users** list and managing groups.
* [Roles and sites](/api/roles-and-sites) explains organization roles, site access and site restriction.
* [Uploads and files](/api/uploads) covers file uploads through the API.
* [User](/api/reference/types/User), [updateUser](/api/reference/mutations/updateUser) and [addUserLocation](/api/reference/mutations/addUserLocation) in the GraphQL reference.
This documentation is built and hosted on [Mintlify](https://mintlify.com), a developer documentation platform.
## Reading the list
* **Edit** and **Upload file** buttons appear only when you can edit the profile (your own, or any profile as an admin). The **Add** button and the crosses on the **Groups** card appear in the same cases, but only an admin's change is accepted.
* **All — Admin** or **All — Member** under **Site access** means no site assignment: the person works in every site with their organization role. *Site — Admin* or *Site — Member* badges list the sites they are limited to and their role at each.
* **Qualifications & eligibility** shows a sentence such as *No education documents on file* for each type with nothing uploaded.
* **Training** shows *No completed trainings on file* until the person completes a training. Each completed row shows **Completed**, **Quiz score** (a dash for trainings without a quiz), **Type** and a **Certificate** download; a *Refresher* marker flags repeat completions of the same training.
## Tips and limits
* Members do not see **Settings**, so there is no link to their own profile in the navigation; an admin can send them the page. Only admins and the person themselves can change a profile.
* The work email, name and organization role are not edited on the profile. Admins set the role when inviting the user.
* Site access can be edited only by admins, and the card is hidden until a site exists. Choosing **All** in a multi-site organization removes every assignment; in a single-site organization the dialog only switches the role.
* Removing every site badge in the **Edit site access** dialog leaves nothing to save and **Save** stays disabled. To lift a restriction, pick **All** instead.
* Site access narrows what a restricted user sees in two ways. Site-scoped records such as equipment are only reachable at the user's sites, and equipment that belongs to no site is out of reach for them. Protocols, policies and trainings restricted to particular sites are hidden unless one of those sites is the user's; those with no site restriction stay visible to everyone.
* Supervisors can only be chosen from other users in the organization; a user cannot supervise themselves.
* Documents are limited to PDF, DOC, DOCX and PAGES files of at most 25 MB; profile photos to PNG, JPEG, GIF and WebP of at most 25 MB.
* Completed trainings are read-only here. Assign, mark attendance and complete trainings from the Training module.
## Related
* [Settings](/guides/settings) covers inviting users, the **Users** list and managing groups.
* [Roles and sites](/api/roles-and-sites) explains organization roles, site access and site restriction.
* [Uploads and files](/api/uploads) covers file uploads through the API.
* [User](/api/reference/types/User), [updateUser](/api/reference/mutations/updateUser) and [addUserLocation](/api/reference/mutations/addUserLocation) in the GraphQL reference.
This documentation is built and hosted on [Mintlify](https://mintlify.com), a developer documentation platform.